Creating the Import Profile
First, you need to create an Import Profile to use for the upload. Click here for more information on how to do this.
The Destination for this import would be User.
For this import, one or both of the following fields need to be used as Key Columns in this Import Profile:
- User ID - this is the unique identifier for the User on the platform.
Tip!
You are best to use this field for updating Users rather than creating, unless you already have a defined User ID that you would like your Users to have,
- Email Address - this is the User's email address. This can be a key column unless you allow duplicate emails on the platform, as then this import will override/merge Users.
The following field is also mandatory for this Import:
- Status - this is the status that the User will be imported with. Below are the status' that the Importer recognises:
- Enabled (now known as Active in the platform)
- Disabled (now known as Inactive in the platform)
- New
- Import
- Deleted
- Locked
- Temporary
- CompanyID - this is the ID for the User's Main Account
Please note that the field NI Number can be configured to display a different label within your platform. If in doubt, contact the Support Team to verify if this field has been renamed within your platform before importing data into it.
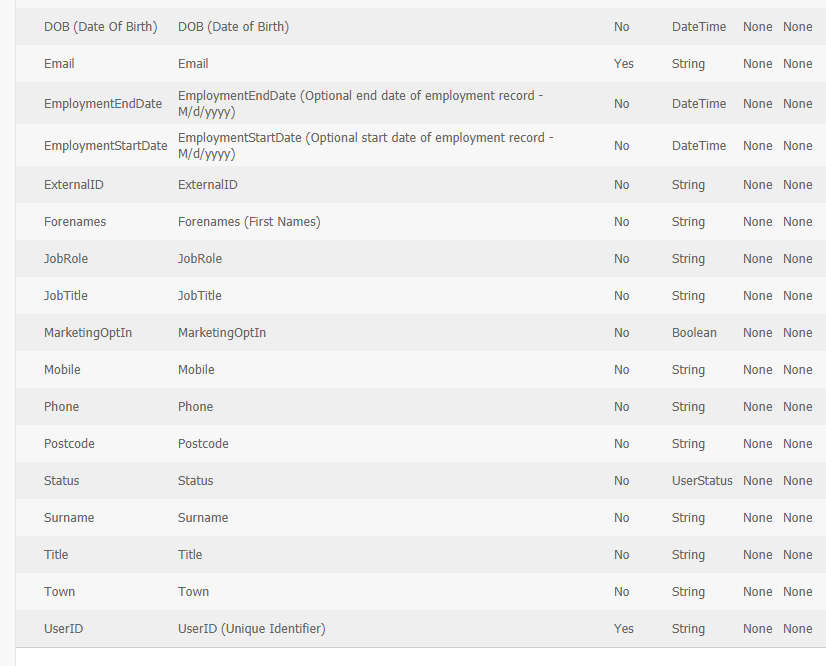
Filling in the Import File
Then, you need to create your import file that you will use to upload the data. Below is a Sample File as a template, with the second row being a description of the field and the third being sample data that will need to be replaced.
All imports should be uploaded in a CSV format, as they lack formatting that would otherwise be included within the file.
Completing the Import Job
We always suggest running an Import Job on the test platform first, before you upload the data onto your live platform.
To learn how to complete an Import Job, click here.