| Live Search | ||||||||
|---|---|---|---|---|---|---|---|---|
|
| Note |
|---|
Warning: We highly recommend and always suggest that you run an Import Job on your test platform first, before you upload the data on live. To learn how to complete an Import Job, click here. |
Creating the Import Profile
First, you need to create an Import Profile to use for the upload. Click here for for more information on how to do this.
The Destination for this import would be be User Manager.
For this import, the following fields need to be used as Key Columns in this Import Profile:
MappedID - this will be the User ID of the User you're wanting to designate a Manager for.
UserID - this is the User ID of the Manager.
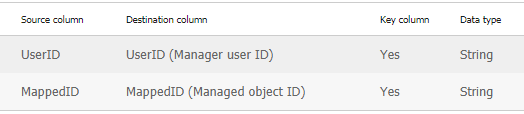
Please note, the MappedID and the UserID must match UserIDs already present within the platform.
| Info |
|---|
This import is for changing the Management tab found against a User record, this will not change the User's Roles on the platform. |
Filling in the Import File
Then, you need to create your import file that you will use to upload the data. Below Below is a Sample File as a template, with with the second row being a description of the field and the third being sample data that will need to be replaced.
User Manager Import Template.csv
All imports should be uploaded in a CSV format, as they lack formatting that would otherwise be included within the file.
Completing the Import Job
We always suggest running an Import Job on your test platform first, before you upload the data on live.
To learn how to complete an import job, click here.