| Live Search | ||||||||
|---|---|---|---|---|---|---|---|---|
|
Before you complete an Import Job, you will first need to create an Import Profile as a template for this.
To learn how to use Import Profiles, click here.
What is an Import Profile?
An Import Profile is the template for your Import. You design your profile by selecting the Import Destination (e.g. Users), which fields you are Importing (e.g. User ID, Forename, Surname, Email Address), and which of the fields is your key column (i.e. User ID). It is essentially where you define how the data will be imported.
You can re-use your Import Profile for multiple Import Jobs.

What is an Import Destination?
The Import Destinations are the areas of your platform that you are able to import data to. For example, Accounts, Opportunities, and Venues.
The Import Destinations are pre-defined, and each contains a set list of fields that you're able to import to when you use this destination. For example, Forename and Surname in the User destination, and Course Label and Cost in the Course Template destination.
You select the Import Destination to be used when you build your Import Profile.

What Import Destinations are available?
You are able to import to many areas of the platform: You may need to use more than one destination in order to fully import your data, which may require multiple imports.
| Import Destination Name | For Importing | Top Tips |
|---|---|---|
| Award | Awards | When you are importing Awards, make sure that you include the Award type such as Award, Certificate, or Qualification |
| Candidate | Delegates | If possible, you should user the User ID and the Course Date ID for Delegate Imports, to ensure that records are updated accurately. You can access the Course Date ID within the DataGrid or the Attributes tab of a Course Date. |
| Company | Accounts | Make sure that you include the Account Group for your Accounts within this Import. It is much better to use the Account Group ID (labelled Company Group ID within the Import Destination) rather than the Account Group Label. These IDs can be found within the Account Group DataGrid or in the Attributes tab of an Account. You will need to include a Status column within your Import so that you can state whether the Account is Enabled or Disabled. All Accounts created using the Importer that do not have a status assigned will be given the status of New, which will prevent Users within that Account from being able to log into the platform. |
| Company Group | Account Groups | We advise that you create Account Groups within your platform rather than importing them. However, if you have a large number of Account Groups, using the Importer will be quicker. Ensure that you include a column for the Parent Account Group ID (labelled Parent Company Group ID in the Import Destination). |
| Course Award | Linking Courses to Awards | This Import Destination is most commonly used to link Awarded Awards to Courses, i.e the Award that the user will achieve when they complete a course. However, it can also be used to set required and preferred Awards for courses. Use the Type field to indicate the course Award relationship: 1= Awarded If possible, try to use the Course ID and the Award ID for this Import rather than Course and Award labels. Both of these will be your key columns. |
| Course Company | Linking Course Templates to Training Providers | This Import Destination is used following a Course Templates Import. It is very common to have one file which is used for both Imports. This Import requires the following columns: Company ID: This is the Account ID of the Training Provider, and one of your key columns. We encourage that you include the course cost, duration, and course text within this Import Profile in addition to the Course Templates file to ensure that all of your data is captured. |
| Course Date | Class or Web Course | This Import requires the following columns: CCLevel: This should always be 4 (any other value may cause problems for bookings). You can also Import the Trainer and the Venue for your course date by including their Label in your Import file. |
| Course Template | Course Templates | This Import destination will allow you to Import the Course Templates into your platform. In order for them to be visible you will need to follow this with a Course Company Import to associate your new templates to your Training Provider Account(s). This Import requires the following columns: Course ID: This should be the Course Template ID and your key column. You can also Import your course text by using the Overview, Description and Summary Import fields. |
| eLearning and Document Delegates | Delegates on E-Learning and/or Knowledge Document courses | For this import you need the ID of the User, the Course Template ID and the Training Provider Account ID. |
Note | Notes for multiple objects | This Import requires the following columns: MappedID: This is the ID of the object that you're adding a note to, this could be a User ID, an Account ID, a Course ID, or an Invoice ID for example. |
| Opportunity | Opportunities | This Import allows you to Import Opportunities, but not Opportunity items, these would need to be added manually following the Import. This Import requires the following columns: Company ID: This should be the Account ID of the training provider who is managing this Opportunity. You can also Import a number of other values including the sales stage, the reference and the probability of the Opportunity. |
| Trainer Resource | Trainers | This Import requires the following columns: Company ID: This is the Account ID of the Training Provider that owns this Resource. |
| Transactions | Invoice transactions / payments | This import requires the following columns:
Please note that it is not possible to import credit note transactions. |
| Resource Course | Linking resources to the courses that they can be used on | This Import is commonly used for Trainer resources to indicate which courses each Trainer is able to lead. This will prevent them from being accessible on the courses they cannot lead. For this Import you will need the Resource ID of the Resource, and the Course ID for the courses. Each row in this file will have one resource to one course, so you may find that you have each Resource listed many times in the same Import file, both the Resource ID and the Course ID should be key columns. You need to include Resource Type Name which should match with one of the resource type names in your platform. |
| Resource Unavailability | For this Import you will need the name of the Resource, and the start date/time and end date/time of the unavailability. This will block out this portion of time in their calendars so that they are unable to be used on courses during this time. | |
| Resource | Non-trainer or venue resources, such as equipment and catering | This import required the following columns: ResourceTypeName: This is the resource type (resource category) that this resource will sit within. For more information on Resource Types, click here. |
| Session Plan Item | Linking courses and course templates to their parent course or course template | This Import can be a tricky as it requires IDs for both the parent course (sessional course) and the child courses (sessions). This Import requires the following columns: Course ID: the ID of the parent course . |
| User | Users | This Import requires the following columns: Company ID: This should be the ID of the Account that this User will be in. There are many other columns available to Import, such as email address, job title, middle name and address. |
| User Award | Linking Users to Awards | This Import destination can be used to Import Users' completed Awards, in progress Awards and targeted Awards This Import requires the following columns: User ID: This should be the ID of the User, and a key column. |
| User Manager | Linking Users to their managers | This Import allows you to link a manager to the Accounts, Users, and Account groups that they manage. This Import requires the following columns: User ID: This should be the ID of the manager User and a key column. |
| Venue Resource | Venues | This Import requires the following columns: Company ID: This should be the Account ID of the training provider that owns this Resource. |
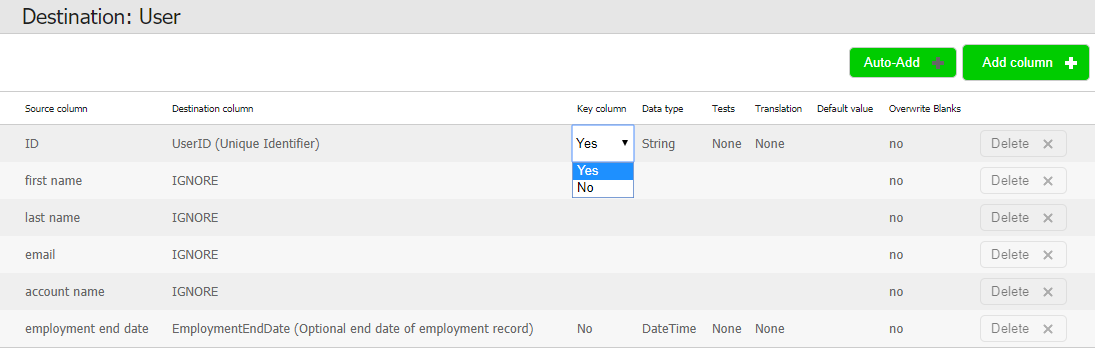
How to choose your Key Columns
Key Columns are how you tell the Import Job to identify unique rows. Typically, Key Columns are ID columns such as User ID, Course ID, or Trainer ID, however you may choose use Email Address if this is a unique identifier of a User or Account. In many cases, a combination of various columns is used.
For example, when importing User Awards, a User may have many Awards, and an Award may have many Users who have achieved it. Therefore, neither User ID or Award ID are unique to each record meaning that a combination of User ID and Award ID must be used.
Key Columns are also used by the Import tool to find out if each record is new or already exists in the database. If the Import tool finds an existing record it will be updated, rather than creating a new record. Every Import you run must have at least one key column.
Setting up a Sample File
For you to be able to create an Import Profile, you will need to first create a Sample File for it to base its columns on. This file needs to be in the exact format as your final Import file, i.e. the columns need to have the same labels. Many people use their actual Import file as the Sample File to save time however, if your actual file is particularly large (over 1000 records) you may want to consider creating a sample file from this to create the Import Profile faster.
We recommend that you use .csv (comma separated values) files for your Imports, rather than .xls (Microsoft Excel file format) or .xlsx (Microsoft Excel Open XML Format Spreadsheet). This is because .csv files do not contain any formatting which could cause issues with the Import. To check the format of your file, look at the suffix of your file name, this should be something like course dates.csv or new users.xlsx. To change a file from .xls/.xlsx into .csv, all you need to do it click Save As within your Import File in Excel, and set the save as type to .csv.
Using the Import Tool to update instead of create
As well as creating new objects, the Import tool can be used to update existing objects. This is all based on the key field(s) that you select when you are creating your Import Profile.
For example, if you wish to update the employment end date for many Users, you could export the list of Users out of the platform using the DataGrid export function, correct their employment end dates, then Import this back into your platform.
To prevent the Import process from creating new, additional Users, you would need to ensure that you have a key column in your Import file which identifies each User (e.g. User ID or Email Address)
If you are just updating one column in the platform, you do not need to reference every column in your Import file, just your identifying column (User ID in the example below), and the column that you are updating.