| Live Search | ||||||||
|---|---|---|---|---|---|---|---|---|
|
| Note |
|---|
Warning: We highly recommend and always suggest that you run an Import Job on your test platform first, before you upload the data on live. To learn how to complete an Import Job, click here. |
Creating the Import Profile
First, you need to create an Import Profile to use for the upload. Click here for more information on how to do this.
To update existing Course Templates, you will need to create a Course Template Destination
To import new Course Templates, you will need to create two Destinations (two import profiles): One for Course Template and a second for Course Company. You will need to import the file under Course Template first, and then reimport re-import either using the same or a new file under Course Company. This process ensures that the Course Template is assigned to a Training Provider.
The following field will need to be a Key Field for the Course Template Import Profile:
CourseID - this is the unique identifying code for the Course Template. This will be stored within the Attributes tab of the Course Template.
You'll need to include this field, plus any field(s) you're wanting to update.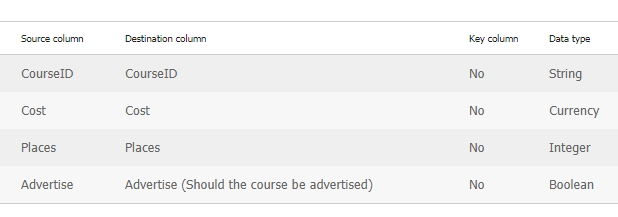
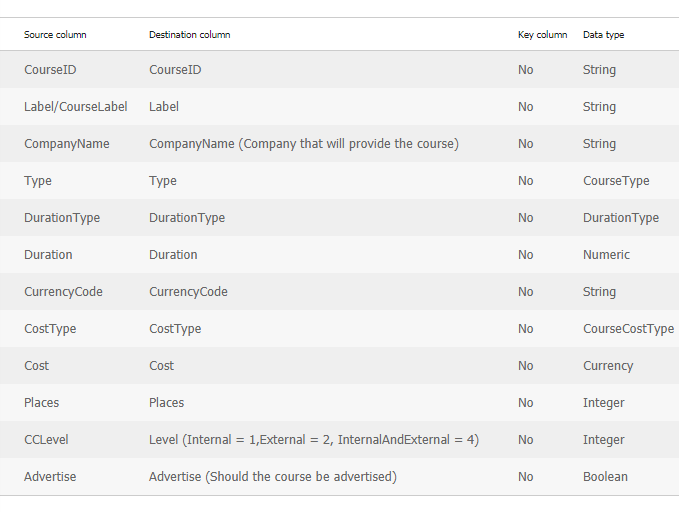
If you're importing new Course Templates, the following fields are also mandatory for the import:
Label - this is the name of the Course Template.
CompanyName - this is the name of the Training Provider you want this Template to be assigned to. (N.B this is the name and NOT the account ID.)
Type - this is the type of Course Template that you're importing. The Importer recognises the following values for this field (must be lowercase):
class (must be lower case c)
elearning
document
web
DurationType - this field designates the duration type for the Course Template. You can choose from the following values for this field:
Day
Hour
Minute
Duration - here, you should enter a numerical value that specifies how many days, hours, or minutes courses with this Template last for.
CurrencyCode - leave this value blank for GBP.
CostType - this field designates the cost type for the Course Template. You can choose from the following values for this field:
1 = Candidate/Delegate
2= Session
4 = Hour
8 = Day
16 = Delegate Day
Places - here, enter a numerical value for the maximum number of places this Template can accommodate. Leave this blank for E Learning or Document courses.
Level - this value needs to be set at 4.
Advertise - here, enter a 1 if you'd like the Template to be set to advertise. Leave this column blank if you want this box unticked.
Waiting List - here, enter a 0 if you would like the Waiting List to use the Default, 1 = Enabled, 2 = Disabled.
CC Level - this needs to be set to “4”.

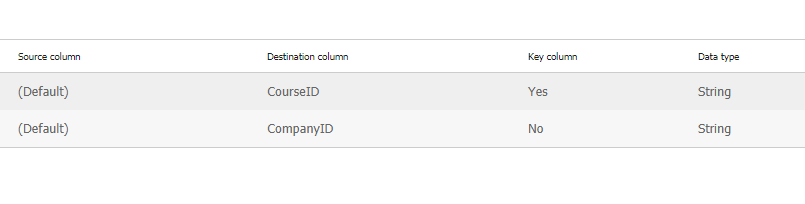
If you are importing new Course Templates, you will also need to do a Course Company import (using a new import profile with a destination of Course Company) following the import of the course templates. The Course Company import will link the new courses to the required training provider. The following will need to be included and also be Key Fields for this import:
CourseID - this is the unique identifying code for the Course Template. This will be stored within the Attributes tab of the Course Template.
CompanyID - this is the Account ID for the Training Provider you want to link this Course Template to.

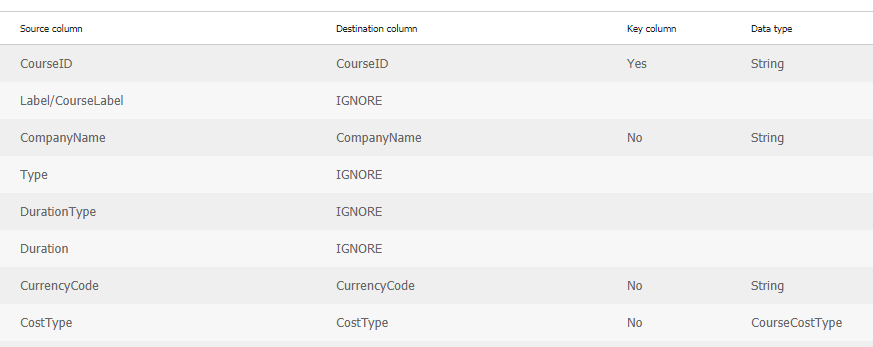
For importing new Course Templates, it's possible to to use one file for both the Course Template and Course Company imports.
Simply set the fields that don't exist in the current import to ignore:

| Info |
|---|
The Delivery Method, eLearning Package Dates, eLearning Package ID and the eLearning setting fields (Auto Complete and Set to Complete if Passed) can only be imported when the Course Template is first added to the platform, these cannot be updated via an import. |
Filling in the Import File
Then, you need to create your import file that you will use to upload the data. Below are some sample files showing you how to format them:
Course Template Import Template.csv
Course Template and Course Company Import Template.csv
All imports should be uploaded in a CSV format, as they lack formatting that would otherwise be included within the file.