| Live Search | ||||||||
|---|---|---|---|---|---|---|---|---|
|
This page explains the steps required for you to add in the HTML Plug-in into your website in order to display Course Manager course dates.
The HTML provided in this page should be included in-line within your web page(s).
Customer Decisions
Your customer should have provided you with their requirements for:
1. How they would like you to group their course dates:
- All course dates on one page.
- A list of course dates per course offered.
- A list of course dates per course Category.
- A list of course dates per Venue.
- A list of course dates per Industry.
2. What columns they would like you to display about your course dates:
- Course Name
- Alias
- Start Date
- End Date
- Start Time
- End Time
- Dates
- Venue
- Trainers
- Course Type
- Places
- Cost
- Cost Type
- Cost With Currency
- Currency
- Currency Symbol
- Enquire button
- Book button
Please note, the URLs that need access the feed must be whitelisted by accessplanit. These are typically provided by the customer ahead of the website development, but if you have trouble loading courses this may be the cause.
If you will be hosting the table in a frame we need to be told to allow for frame security.
Date and Time formatting
Some users have experienced issues with course dates & times appearing incorrectly in a different format (UK or US) when using the plugin.
This is due to the language settings in their the user's browser, which can be accessed in Google Chrome by copying this (chrome://settings/?search=language) into the address bar, or through your browser settings in Chrome and other browsers.
All users should have their language set to their geographical area, for example: English (United Kingdom) for UK dates and times, and English (US) for US dates and times.
Example Website
Here is an example website which uses this plug-in:
https://www.accessplanit.com/health-and-safety-courses
Example HTML
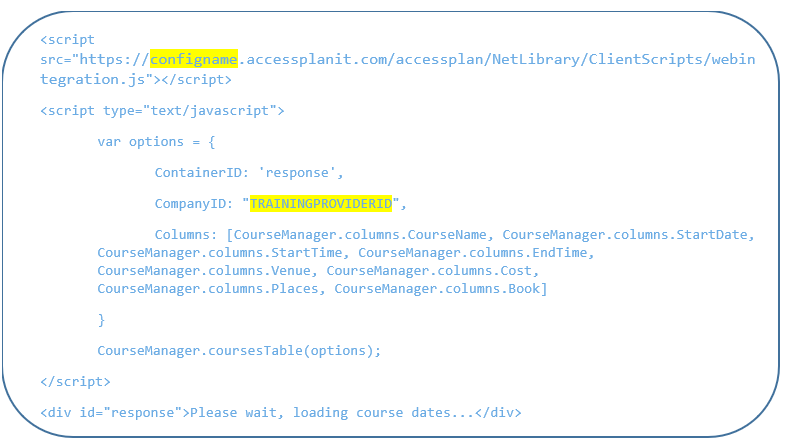
<script src="https://configname.accessplanit.com/accessplan/NetLibrary/ClientScripts/webintegration.js"></script>
<script type="text/javascript">
var options = {
ContainerID: 'response',
CompanyID: "TRAININGPROVIDERID",
Columns: [CourseManager.columns.CourseName, CourseManager.columns.StartDate, CourseManager.columns.StartTime, CourseManager.columns.EndTime, CourseManager.columns.Venue, CourseManager.columns.Cost, CourseManager.columns.Places, CourseManager.columns.Book]
}
CourseManager.coursesTable(options);
</script>
<div id="response">Please wait, loading course dates...</div>
HTML Breakdown & Further Options
Integration script
<script src="Https://configname.accessplanit.com/accessplan/NetLibrary/ClientScripts/webintegration.js"></script>
This is used to reference the Accessplanit JavaScript needed to build the table.
Build Options object
In a <script> tag, build up an options object:
var options = {
ContainerID: 'response',
CourseIDs: ["COURSEID"],
CompanyID: "TRAININGPROVIDERID",
CategoryIDs: [],
IndustryIDs: [],
VenueIDs: [],
Columns: [],
CssClasses: { table: 'table', headrow: '', headcell: '', valuecell: '', valuerow: '', datecell : '', courseName: '', trainers: '', venue: '', anchor:'btn', bookBtn: 'tdbtn', enquireBtn: 'tdBtn'}
}
Note: CompanyID is mandatory here. This is the Training Provider’s Company ID in CourseManager. The rest of the options can be used to filter down the results as desired.
ID fields can be found at the end of this page.
ContainerID is the ID of a container in your website which will have its HTML replaced with the requested course table.
Columns: If empty then this will include all columns defined as default(below). If only specific columns are desired, then use the object CourseManager.columns and include desired columns in an array.
E.g. Columns: [CourseManager.columns.CourseName, CourseManager.columns.Book],
CssClasses: The client website has the option of just styling the container passed to us or pass in specific classes to the CssClasses object. The options in the example should be fairly self-explanatory.
Change column names
For example, include the following after building options object to change “Course Name” column to “Product Name”: CourseManager.columns.CourseName = 'Product Name';
It is important to note that the position of this line of code is extremely important and should be located after <script type="text/javascript"> like so:
<script src="https://trainingprovider.accessplanit.com/accessplan/NetLibrary/ClientScripts/webintegration.js"></script>
<script type="text/javascript">
CourseManager.columns.Venue = 'Location';
var options = {
ContainerID: 'response',
CompanyID: "TRAININGPROVIDERID",
CourseIDs: ["COURSEID'S"],
Columns: [CourseManager.columns.Venue, CourseManager.columns.StartDate, CourseManager.columns.Book]
}
CourseManager.coursesTable(options);
</script>
Similar assignments can be used for all column headers:
Columns Available
var allColumns = {
CourseName: "Course Name",
Alias: "Alias",
CourseType: "Course Type",
StartDate: "Start Date",
EndDate: "End Date",
StartTime: "Start Time",
EndTime: "End Time",
Dates: "Dates",
Places: "Places",
Cost: "Cost",
CostType: "Cost Type",
Currency: "Currency",
CurrencySymbol: "Currency Symbol",
Venue: "Venue",
Trainers: "Trainers",
Enquire: "Enquire",
Book: "Book"
};
Call Coursemanager
Now the options object needs to be passed into the CourseManager object as below:
CourseManager.coursesTable(options);
The container div should be populated with the data and styling requested.
Define the loading message
Include any loading message you want in the container being populated, e.g.
<div id="response">Please wait, loading course dates...</div>
Cookies
The accessplanit system uses cookies to store the content of Users' shopping baskets, so that the information is remembered as they navigate around your website and through the basket.
Once a customer clicks to add a course to their basket, we will store a cookie recording this.
If you do not yet have a cookie policy available on your website, we encourage adding one to inform your customers that cookies will be recorded.