This page will guide you through how to integrate accessplanit with your Sage financial software.
You must be within the Advanced band or higher to integrate with Zynk/Sage as this is a chargeable module/integration. Please speak to your CSM if you are unsure whether you should have access to this feature.
You must have an account with Zynk, and for Sage integration you must be using Sage 50.
Sage Integration Preparation
Before starting the integration process to connect accessplanit with your Sage account, please review the following questions and provide the answers to the accessplanit team member that will be supporting you with the set-up of Sage integration
- Would you like your invoices to be 'posted' or 'non-posted'
- Can you provide accessplanit with the Sage IDs assigned to your current customers to prevent duplicates being created?
- Would you like accessplanit to send customer data over to Sage?
- Would you like accessplanit to send invoice data over to Sage?
- Would you like accessplanit to send transactions data over to Sage?
- What would you like the format of your new customers IDs in Sage to be? This is typically “5|3|DESC” which means five alpha-characters and descending three numeric-characters (from 999)
- Would you like manually generated credit notes to be ignored by the integration? these are typically hidden
- Would you like any negative valued invoice items (such as a -£10 discount) to be merged into your positive valued invoice items?
If you do not handle negative valued invoice items in Sage, this option will evenly absorb any minus figures into the positive values - Would you like to use the Invoice Reference Number as the unique invoice identifier rather than the Invoice ID?
This is not a valid option if you have multiple training providers in your platform than use the same Sage account. - What would you like your default nominal code to be for your invoices? Within Sage this is typically '4000'
- What would you like your default nominal code to be for your transactions? Within Sage this is typically '1200'
Integrating with Sage
To integrate with Sage you will need to download the middleware Zynk. This service has its own charges so please get in touch with Zynk to find out about their annual charge. Zynk converts the Invoices and associated information stored in accessplanit into information that can be processed and imported into your Sage account.
You will need to download and set up Zynk in the correct way so that it interprets your accessplanit data for Xero, and this guide will walk you through this process. Zynk does not have a download option for Macs (.dmg) so please ensure that you have access to Windows to use this middleware.
Please note that Sage integration is an additional module. If you do not have this module or you are unsure, please get in touch with your Customer Success Manager.
Downloading Zynk
A trial of Zynk can be obtained from the following website: http://zynk.com/download-trial/
Once you have completed the form, you will receive an email with your Licence Key and a link to download Zynk, click this link to go to your Browser and Download Zynk.
Once you have downloaded and installed Zynk you’ll be asked for your Licence Key.
Click Activate to open Zynk.
Workflow Quick Guide
Please find below an example of the workflow used for integrating with Sage 50:
- HTTP Get/Post to Web Page
- Accesses integration module.
- Produces and downloads all data since last export as an XML file.
- Sets preliminary marker for when the export was performed, which can be confirmed as successful (or unsuccessful) later.
- Import Customers
- Supplied with an XML file from point 1 as a source.
- Imports all customer records related to the exported invoices/credit notes/transactions.
- Import Invoices
- Supplied with an XML file from point 1 as a source.
- Imports all invoice/credit note records in the exported data.
- Import Transactions
- Supplied with an XML file from point 1 as a source.
- Imports all transaction records in the exported data.
- HTTP Get/Post to Web Page
- Accesses integration module.
- Confirms successful export.
- At this point it is also possible to let the platform know that the import failed by using an alternate URL.
- Archive Workflow Data
- Collects all log data from the Workflows and Archives it into a zip folder for reference.
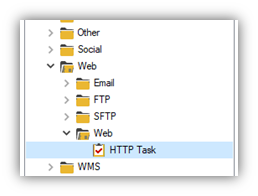
How to create HTTP 1 Task for a Sage - Zynk Workflow
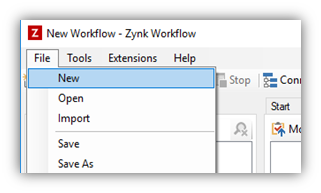
- To create HTTP Task 1, click File and New.
- Open the Web folder from left panel.
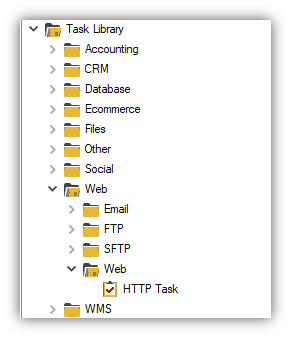
- Select HTTP Task from your workflow task list and change options in the right panel as follows:
Change the Output File's Data Type to File.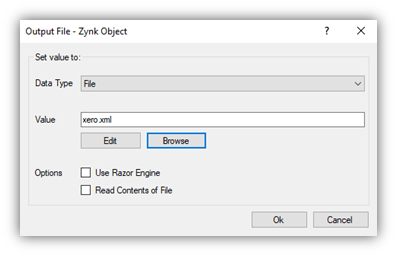
Create a notepad file, and save it somewhere on your hard drive with a .xml extension by naming the file something like “SageData.xml”. Then, click the Browse button and select the file. Click OK.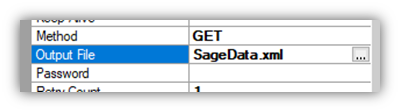
- Add the following URL to the workflow. Make sure you change the ‘your system name here’ to your platform’s name and change the encrypted code. Your implementation manager will be able to provide you with this:
https://yoursystemnamehere.accessplanit.com/accessplantest/services/sageintegration.asmx/GetInvoices?encrypted=12345678901234567890&dm=2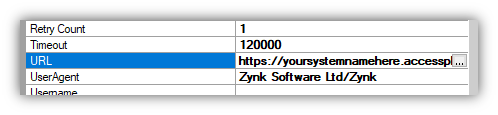
- Click Save once you have made these changes.
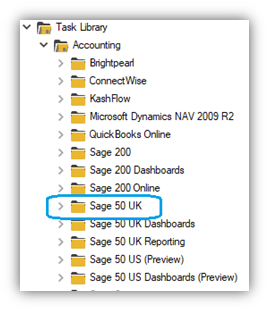
- Open the Accounting folder from left panel and open the Sage 50 UK folder.
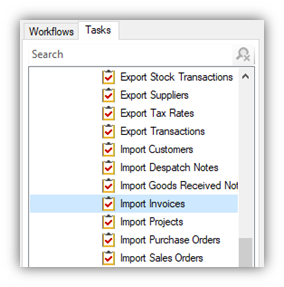
How to create a Customer Task
- Double click on Import Customers from your workflow task list to add it to your Tasks

- Select it from your Tasks list and change the options in the right panel as follows:
To set up the Sage 50 Connection, click the down arrow and click New.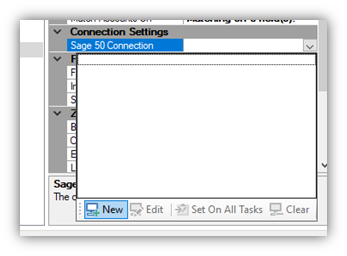
Name the connection as you see fit and click Next.
Select your target Sage 50 company from the list and provide your login details for your Sage instance.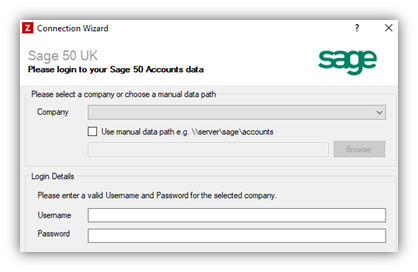
Select the Input File, and change the Intput File's Data Type to File.
Browse to the folder you used for the HTTP Task and supply the filename you used, e.g. “SageData.xml”, and then click OK.
How to create the Invoice Task
- Double click on Import Invoices from your workflow task list to add it to your Tasks.
- Select it from your Tasks list and change the options in the right panel as follows:
For your Sage 50 Connection, select the connection you built for the Import Customers task.
Select the Input File, and change the Intput File's Data Type to File.
Browse to the folder you used for the HTTP Task and supply the filename you used, e.g. “SageData.xml”, and then click OK.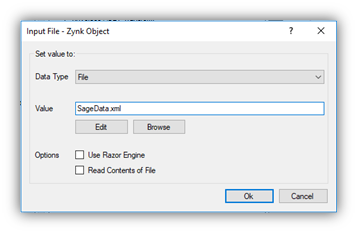
How to create a Transactions Task
- Double click on “Import Transactions” from your workflow task list to add it to your Tasks.
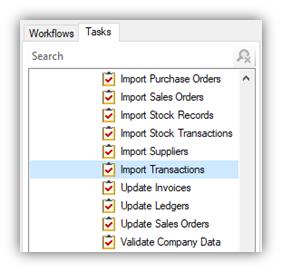
- Select it from your Tasks list and change the options in the right panel as follows:
For your Sage 50 Connection, select the connection you built for the Import Customers task.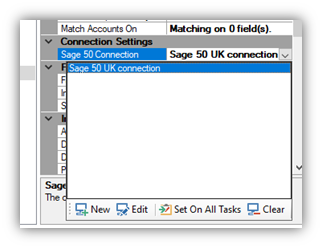
Select the Input File, and change the Intput File's Data Type to File.
Browse to the folder you used for the HTTP Task and supply the filename you used, e.g. “SageData.xml”, and then click OK.
Please let accessplanit know what the Bank Reference for your transactions should be. If this is not in place your transactions task will fail
How to create HTTP 2 Task
- Open “Web” folder from left panel
- Select the last “HTTP Task” from your workflow task list and change options in the right panel as follows:
Add the following URL. Make sure you change the ‘your system name here’ to your platform's name and change the encrypted code. Your implementation manager will be able to provide you with this
https://yoursystemnamehere.accessplanit.com/accessplantest/services/sageintegration.asmx/GetInvoices?encrypted=12345678901234567890&dm=2&changeExportStatus=1
Note that if you want to keep testing the output from accessplanit, rather than only new customers/invoices/transactions created since the last export, you should use the following URL instead to reset the last export date:
https://yoursystemnamehere.accessplanit.com/accessplantest/services/sageintegration.asmx/ResetLastExportTime?encrypted=12345678901234567890&dm=2 - Before continuing, ensure that Sage is not open on any machine, otherwise the files will be locked and the imports will fail.
- Click Run which will prompt you to name and save your workflow.

- If you wish to save the workflow and not run it at this time, click Save.

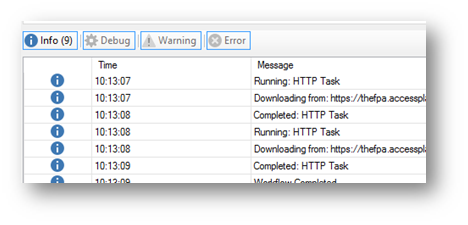
- After the workflow has been run, status messages and errors/issues can be found in the footer section on Zynk:
What information is sent to Sage from accessplanit?
There are three sets of data in the Sage XML feed
- Customer Data
- Invoice Data
- Transactions Data
Each set of data is reliant on the last one being successful, for example you cannot integrate the transactions into Sage until you have successfully integrated the invoices.
Customer Data
| To (Sage) | From (accessplanit) |
|---|---|
| A/C | External Sage ID (System Mapping) |
| Company Name | Account Name |
| Terms Agreed | Always 1 |
| Default Tax Code | User Attribute Accounts do not have a setting |
| Contact Name | Blank for Accounts Title for Users |
| Contact Name | ‘Finance’ for Accounts Forenames for Users |
| Contact Name | ‘Manager’ for Accounts Surname for Users |
| Street 1 | Account/User Address. If a separate billing address is provided this will be used instead of the main address. |
| Town | Account/User Town. If a separate billing address is provided this will be used instead of the main town. |
| Post Code | Account/User Postcode. If a separate billing address is provided this will be used instead of the main postcode. |
| County | Account/User County. If a separate billing address is provided this will be used instead of the main county. |
| Country | Account/User Country. If a separate billing address is provided this will be used instead of the main country. |
| Telephone | Account/User Phone. If a separate billing address is provided this will be used instead of the main phone. |
| Fax | Account/User Fax. If a separate billing address is provided this will be used instead of the main fax. |
| Telephone 2 | Account/User Mobile. If a separate billing address is provided this will be used instead of the main mobile. |
Account/User Email. If a separate billing address is provided this will be used instead of the main email. |
Invoice Data
To (Sage) | From (accessplanit) |
|---|---|
Inv. No. | Invoice ID |
A/C | External Sage ID |
Notes 1 | Full Invoice Reference |
PaymentType Either:
| Always ‘SalesReceipt’ |
| Date | Date Created |
Type, this can be any of the following
| Invoices: ProductInvoice Credit Notes: ProductCredit |
Invoice Name | Customer forename |
Invoice Name | Customer surname |
Invoice Addresss 1 | Customer address |
Invoice Address 3 | Customer town |
Invoice Address 5 | Customer postcode |
Invoice Address 4 | Customer county |
Product Code | Always ‘S2’, this means that the items are special lines and should show at the top of the Invoice product list. |
Description | Invoice item label. Depending on the item this could be: - Name of the course. - Discount label. - Delegate name (Delegate status). Placeholder bookings are not included. |
Comment 1 | For course Invoice items this displays the date range of the course. For eLearning Delegates is displays the start date. |
Comment 2 | Always blank. |
| Quantity | This is always ‘1’ even if multiple Delegates or a Placeholders have been booked. |
| Unit Price | Net value of the Invoice item. |
Nominal Code | Nominal Code |
| Invoice Item TaxCode | Tax Code stored within the related Course Template's Attribute. |
| Global Tax Code | Tax Code This is the tax code assigned to the invoice issuer (training provider). |
Transactions Data
| From (accessplanit) |
|---|
Transaction’s ID (note not the Transaction ID field). For SalesInvoice transactions, the Invoice ID is used. |
External Sage ID |
Invoice ID |
The transaction type is generated based on what the transaction is: SalesInvoice - these transactions are the request for payment, every invoice with a value will have one of these transactions. SalesReceipt - payment made on the invoice, this references the SalesInvoice. SalesCredit - Credit Note payment. SalesPayment - a refund transaction. |
Date Created |
Net value of the transaction |
Tax value of the transaction |
Nominal Code |
Bank Reference |
Transaction method |
| Derived from the Invoice |
Transaction tax rate |
Settings available to configure
You can now send Invoices from accessplanit to Sage with a status of 'not posted', allowing you to make changes to them before they are fully committed.
You can also now hide two fields from the feed:
- Global Tax Rate
- Global Nominal Code
If you choose to hide the two 'Global' values from the feed, this means the tax rate and nominal codes are pulled from each individual Invoice item rather than the Invoice itself.