| Live Search | ||||||||
|---|---|---|---|---|---|---|---|---|
|
The Enquiry Plugin allows you to link your website's enquiry form with your Opportunities module in your accessplanit system, and automatically create new Opportunities when someone completes the form!
This provides people with an alternative option to booking, helps to keep track of enquiries, and keeps prospects and customers within the same system - and you can also have different enquiry forms per training provider (if you have multiple), so you can organise these easier.
When people make an enquiry via the Enquiry Form, they will be created as a new user (unless they already exist within the system), and an Opportunity will be created within your system ready to be managed.
Please note that you will require the Opportunities module to use this functionality. Please speak to your Customer Success Manager if you are unsure if you have this module.
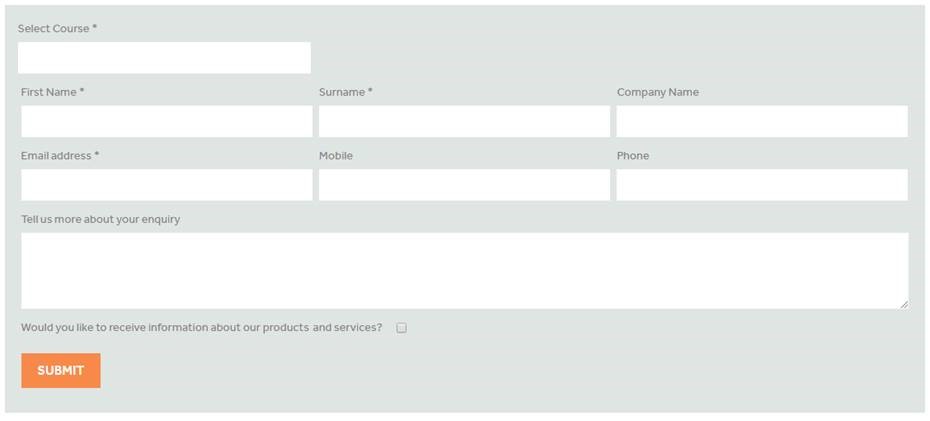
Example Website
Here is an example website which uses this API, the structure and design of the form (i.e. the layout, the fields included and the styling) are defined by yourselves, so you are not restricted to a basic design!
https://www.accessplanit.com/health-and-safety-courses
Enquiry Fields
When you are building the enquiry form on the website, you can link the options in your form to a selection of fields in your accessplanit system.
The following fields are available to be updated via the Enquiry Form plugin:
User Based fields
- Forename (Mandatory)
- Surname (Mandatory)
- Phone
- Mobile
- Address
- Town
- County
- Country
- Postcode
- MarketingOptIn (boolean value, either true or false)
Company/Account Based Fields
- CompanyName
- CompanyEmail
- CompanyPhone
- CompanyAddress
- CompanyTown
- CompanyCounty
- CompanyCountry
- CompanyPostcode
- CompanyGroupID
- CompanyGroupName
- IndustryName
Enquiry Based Fields
- CourseTemplateID (the course that is being enquired about)
- Title
- AdditionalInformation
Please note that you must supply a valid OwnerID back alongside this information when submitting an enquiry.
The OwnerID is the ID of the training provider that will own this Opportunity, please speak to a system administrator for a list of the Owner IDs.
Behind the Scenes
When someone completes the enquiry form that you have built, the following events will happen in the linked accessplanit system:
- A new User is created within the system
Unless this User already exists, a new user will be created using the personal information supplied in the form - A new Account is created within the system
If Account details have been supplied, a new account will be created using the 'Company' information supplied, unless this Account already exists - The newly-created User is linked to the newly created Account
The User created in step 1 will be added into the Account created in step 2
If Account details are not supplied by the user, or you do not capture them in your form, the user will be added into the holding 'Guest Company' - The Account is linked to an Industry
If the user has selected an Industry within the form, their new Account will be added to that Industry - An Opportunity is created:
- The Opportunity will be owned by the 'Owner ID' company that you supply within the feed
- The Opportunity will be given a standard label, such as “Online enquiry”
- The Opportunity will be mapped to the created/matched Account and User from steps 1 and 2
- The 'Description' field against the Opportunity will be populated with the free-text supplied by the User for the 'Additional Information' field.
- The selected Course Template is added as an item to the Opportunity.
- If the user has selected a Course Template for their enquiry, a new Opportunity item for that specific course will be created and linked to the new Opportunity.
We could then build a Workflow to automatically notify a member of the admin team once an Opportunity has been generated.
Integration Script
Before you begin to build your enquiry form and link it to your accessplanit system using the below script, please get in touch with your Customer Success Manager to whitelist your website URL, otherwise you will not be able to successfully complete the below process.
- Integration script
Code Block language xml theme DJango <script src="https://yoursystemnamehere/accessplan/NetLibrary/ClientScripts/webintegration.js"></script>
This is used to reference the Accessplanit JavaScript needed to build the table - Build Options object
In a <script> tag, build up an options object:
| Code Block | ||||||
|---|---|---|---|---|---|---|
| ||||||
var courseOptions = {
        ListID: 'courses',
        CourseIDs: [],
        CompanyID: "",
        CategoryIDs: []
       }

var opportunityOptions = {
        OwnerID: "",
        Title: "Online Enquiry",
        Forename: "",
        Surname: "",
        Email: "",
        Phone: "",
        Mobile: "",
        Address: "",
        Town: "",
        County: "",
        Country: "",
        Postcode: "",
        CompanyName: "",
        CompanyEmail: "",
        CompanyPhone: "",
        CompanyAddress: "",
        CompanyTown: "",
        CompanyCounty: "",
        CompanyCountry: "",
        CompanyPostcode: "",
        CompanyGroupID: "",
        CompanyGroupName: "",
        IndustryName: "",
        CourseTemplateID: ""
        AdditionalInformation: ""
        MarketingOptIn: ""
} |
Note: courseOptions is used to get courses and populate the List whose ID is passed in the ListID property.
opportunityOptions are the options which can be passed to the ‘EnquiryManager.createOpportunity’ function as below. These options can be populated by the values in your form elements.
3. Call EnquiryManager
To populate a list with all courses call the EnquiryManager function as below:
EnquiryManager.getCourses(courseOptions);
Now after the User has selected values on your form, the opportunityOptions options object needs to be passed in to the course manager object as below: EnquiryManager.createOpportunity (opportunityOptions, success, error);
As this is an asynchronous process, success and error call backs can be used to monitor results. The example below shows how these callbacks can be used:
Example HTML
Please note that the CompanyID and OwnerID fields are the account ID of the training provider, please speak to your Customer Success Manager for a list of training provider IDs
| Code Block | ||||
|---|---|---|---|---|
| ||||
<script src="https://yoursystemnamehere.accessplanit.com/accessplan/netlibrary/clientscripts/webintegration.js"/> |
| Code Block | ||||||
|---|---|---|---|---|---|---|
| ||||||
var courseOptions = {
    ListID: 'courses',
    CourseIDs: [],
    CompanyID: "TRAINIBVKH",
    CategoryIDs: []
}

var opportunityOptions = {
    OwnerID: "TRAINIBVKH",
    Title: "Online Enquiry",
    Forename: "",
    Surname: "",
    Email: "",
    Phone: "",
    Mobile: "",
    Address: "",
    Town: "",
    County: "",
    Country: "",
    Postcode: "",
    CompanyName: "",
    CompanyEmail: "",
    CompanyPhone: "",
    CompanyAddress: "",
    CompanyTown: "",
    CompanyCounty: "",
    CompanyCountry: "",
    CompanyPostcode: "",
    CompanyGroupID: "",
    CompanyGroupName: "",
    IndustryName: "",
    CourseTemplateID: "",
    AdditionalInformation: ""
}

$(function () {
    $('#courses').on('change', function () {
        opportunityOptions.CourseTemplateID = this.options[this.selectedIndex].value;
    });

    $("#createEnquiry").on('click', createEnquiry);

    $('#title').on('input', function () {
        opportunityOptions.Title = this.value;
    });

    $('#forename').on('input', function () {
        opportunityOptions.Forename = this.value;
    });

    $('#surname').on('input', function () {
        opportunityOptions.Surname = this.value;
    });

    $('#cname').on('input', function () {
        opportunityOptions.CompanyName = this.value;
    });

    $('#email').on('input', function () {
        opportunityOptions.Email = this.value;
    });

    $('#mobile').on('input', function () {
        opportunityOptions.Mobile = this.value;
    });

    $('#phone').on('input', function () {
        opportunityOptions.Phone = this.value;
    });

    $('#note').on('input', function () {
        opportunityOptions.AdditionalInformation = this.value;
    });

    setTimeout(function () {
        EnquiryManager.getCourses(courseOptions)
    }, 1000);
});
    function createEnquiry() {
        if (isEmptyOrSpaces(opportunityOptions.Forename) ||
            isEmptyOrSpaces(opportunityOptions.Surname) ||
            isEmptyOrSpaces(opportunityOptions.Email)) {
            alert("Please enter all required values");
            return;
        }

        EnquiryManager.createOpportunity(opportunityOptions,
            function (data) {
                alert("Enquiry successfully sent.");
            },
            function (data) {
                alert(data.statusText);
            });

    }
    function isEmptyOrSpaces(str) {
        return str === null || str.match(/^ *$/) !== null;
    }
</script>

//Include the form fields here. If List ID is populated in courseOptions then the ID of the drop down will need to match that |
Marketing Opt-In
The Marketing Opt-In field is a newer addition, and allows you to add in a Marketing Opt-In checkbox which, if ticked, will subscribe the user to marketing emails.
The value for this field must be passed through to accessplanit as a boolean value; true or false.
This text is fully customisable and the default state of the checkbox is up to you; however, for GDPR reasons, we recommend that this box is unchecked as default.