Live Search spaceKey HG additional page excerpt placeholder Search for a solution type page
Document Templates are an easy way to store a variety of different types of documents within your platform that you need to regularly send out to Users. Document Templates can be used to generate Certificates, Sign-In Sheets/Registers, Joining Instructions, Name Badges, and even Door Signs.
If you are having issues with a Document Template you have made, or Document Templates in general, please visit this related Troubleshooting page.
To learn how to use Document Templates, click here.
To access the Document Template Merge Field Glossary, click here.
| Widget Connector | ||
|---|---|---|
|
Where to find Document Templates
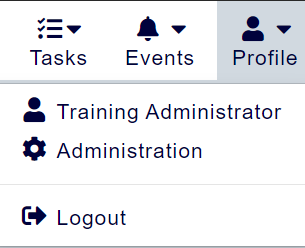
Click on the User Icon at the top right hand side of the platform and select Administration:
Within this page, click the menu option Document Templates:

Setting up a Document Template
To start creating a Document Template, you'll first need to fill in the following fields:
Account
This is the Account that the Document Template is assigned to. Please note, you can only store Document Templates against Course Templates where this Account is assigned as the Training Provider.
Name
This is the name of the Document Template. We recommend naming your Template something that is easily identifiable.
Active
Ticking this box will determine whether this Document Template can be selected and generated throughout the platform.
Can Be Issued
Ticking this box determines whether this Document Template can be issued manually to Delegates.
Upload File
Here, you can upload the file you wish the Document Template to be.
Applies to ID Type
This determines where the Document Template can be stored. Only Course can be selected here.
Details Used
This determines whether Document Template uses Trainer or Delegate details.
How do Document Templates work?
Document Templates use information stored on the platform to create a variety of documents that can be generated for both Trainers and Delegates. The easiest way to create a Document Template is within Microsoft Word. Merge Fields within Word can be used to pull though information specific to each Course, Delegate, and/or Trainer to create a unique document.
Document Templates can either be produced manually as and when you need them, or generated automatically and emailed to the people who need them.
Here are a couple of example Document Templates (click to enlarge):
| View file | ||||
|---|---|---|---|---|
|
| View file | ||||
|---|---|---|---|---|
|
What Merge Fields are available in Document Templates?
Merge Fields can pull through a large variety of information from your platform. To access the Document Template Merge Field Glossary, click here.
If you are creating a Sign-In Sheet, you need to ensure that you put :number at the end of the Field Name.
For example:
candidate_name:1
candidate_name:2
candidate_name:3
If you don't add this in, the first field will repeat itself down the list.
Using Attributes in Document Templates
It is possible to pull some attribute values into your Document Templates.
For this, you will need to find out what the attribute's number is. Each attribute field in the platform has a number to identify it. The accessplanit support team or your CSM (Customer Success Manager) will be able to let you know what your attribute numbers are.
You can pull attributes for Users, Delegates, Course Templates, and Course Dates onto your Document Templates.
usercoursedate_attr_n
Add the attribute merge field into your Document Template as you would with any field, replacing the 'n' with the attribute number that you require, e.g. candidate_attr_10002.
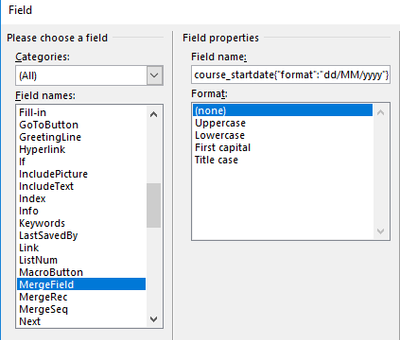
Managing Date Formats in Merge Fields
You are able to manipulate the format of dates within your Documents, such as outputting a start date for a Course of 26 January 2018 or 26-Jan-18
To do this you will need to add the following to the end of your Merge Field {"format":"dd/MM/yyyy"}, changing the dd/MM/yyyy to the format of your choice
Here are a few example formats:
01 December 2018 17:00
Please note, use capital M for month and lowercase m for minute.
Please note, use capital H for 24 hour format, use lowercase h for 12 hour format.For example:
- course_startdate{"format":"dd-MM-yyyy"}
- course_enddate{"format":"MMMM yy"}
- course_starttime{"format":"HH:mm"}
- candidate_award_expires{"format":"dd MMMM yyyy"}
Managing HTML fields in Document Templates
You are able to pull the HTML stored within the platform into your Document Templates for specific fields. For example, if you apply formatting to your venue description text, this can be pulled into your Document Template to make your Document more aesthetically pleasing.
To do this, you just need to add {"format":"html"} to the end of your Merge Field.
For example:
- course_overview{"format":"html"}
- course_description{"format":"html"}
- course_overview{"format":"html"}
- course_summary{"format":"html"}
- course_joininginsructions{"format":"html"}
- venue_description{"format":"html"}
Generating Document Templates
Document Templates can be be attached to a Workflow's Actions to be sent out to Delegates or Trainers automatically. To learn how to attach a Document Template to a Workflow, click here.
You can also generate Document Templates manually via a DataGrid. Once you've clicked the Generate Document option, a dialog box will open.
Here's a breakdown of the fields within this dialog box:
Document Template
From here, you can select the Document Template you wish to generate. Please note, only Document Templates that are assigned to the Training Provider of this course will be able to be generated.
Output Format
Here, you can choose which type of file the document generates as. You have the choice between a PDF or a Word Document.
Generation Type
This determines how your document is generated. There are three types of Generation Type available:
- Create - this option automatically downloads the document so that it can be printed.
- Issue - puts a link to view the Certificate in the Delegate's learner portal, which can be viewed in the My Awards page.
- View - allows you to view the document.
Exclude Previous Recipients
This option will exclude sending or re-issuing the document to any Delegates who have had the Document created or issued previously.